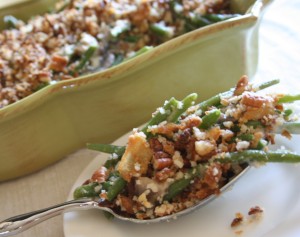
Cheddar-Pecan Green Bean Casserole
Green bean casserole is an iconic dish that most Americans expect on their Thanksgiving holiday table. Originally made with canned green beans and condensed cream of mushroom soup, I took the basic elements of this classic dish and gave it a fresher, modern spin.
First, I substituted tender haricots verts for the canned green beans.
What are haricots verts? Quite simply, they are very small and slender French green beans. (Haricot verts is French for green beans.) They tend to be more tender and flavorful than the thicker American green beans. Most markets now carry them both fresh and frozen.
Next, instead of using canned soup as my sauce, I made a quick cream sauce and flavored it with some shredded sharp white cheddar cheese. (Isn’t everything made better with cheese?!)
Lastly, I tossed chopped pecans and panko bread crumbs with the classic French fried onions for a crunchy topping that makes the dish in my opinion.
This homemade version of the classic canned soup green bean dish is sure to become a favorite at your house. The haricots verts, pecans, and the touch of sharp cheddar in the sauce elevate this dish to new heights. It’s so good you’ll serve it year round!
Cheddar-Pecan Green Bean Casserole
4 tablespoons unsalted butter, plus extra to grease the baking dish
1 1/2 pounds fresh or frozen haricots verts, trimmed
8 oz. button mushrooms, trimmed and thinly sliced
2 cloves garlic, minced
1/4 teaspoons freshly ground nutmeg
2 tablespoons all-purpose flour
3/4 cup chicken stock
3/4 cup heavy cream
1/2 cup shredded sharp white cheddar cheese
Kosher salt and freshly ground black pepper
3/4 cup French fried onions
1/4 cup panko bread crumbs
1/4 cup chopped pecans
Preheat the oven to 395 degrees. Lightly grease a 9- x 13-inch casserole dish with butter and set aside.
Over high heat, bring a large pot of salted water to a boil. Add the beans and cook until just tender, about 2 minutes. Drain and immediately plunge the beans into a large bowl of ice water to stop the cooking. Drain again and set aside.
In a large saucepan over medium-high heat, melt 2 tablespoons of the butter. Add the mushrooms and cook, stirring occasionally, until the mushrooms begin to give up some of their liquid, about 5 minutes. Add the garlic and nutmeg and cook until fragrant, about 2 minutes. Sprinkle the flour over the mushrooms and stir to combine. Slowly stir in the broth and heavy cream. Reduce the heat to medium-low and cook, stirring frequently, until the mixture thickens, about 8 minutes. Remove from the heat and stir in the shredded cheese. Season with salt and pepper to taste. Add the green beans and stir until well coated. Spoon the mixture into the prepared pan.
In a medium mixing bowl toss together the French fried onions, bread crumbs, and pecans. In a small saucepan, melt the remaining 2 tablespoons of butter. Stir the melted butter into the onion mixture. Sprinkle the topping evenly over the green beans. Transfer to the oven and bake until golden and bubbly, about 10 to 12 minutes.
Excepted from “Simply Suppers” by Jennifer Chandler.


 `
`


